CZECHPOINT


The Jawa Perak (image from 1952 brochure)  


BILL'S PERAK PROJECT (Part 2)
by Bill English, Kamloops, British Columbia, Canada
Click for Part 1          Click for Part 3        Click for Part 4


GETTING STARTED

There was no way I was going to be able to stand looking at that little Perak for too long before trying to fire it up. I didn't last two months. So I mixed some gas at 40:1 and put about a gallon in the tank. Checked the oil. Checked the spark - looked pretty strong. Kicked it over a few times. Then I turned the ignition on and with about three kicks away she went! Sounded great.

Then, of course, it was not humanly possible to have it running and not go for a ride even though it wasn't licensed. So off I headed for a quick boogie around the neighborhood. I was quite surprised by how well it pulls. What a great little machine! The sitting position seems a bit forward. The gears are backward - up for first and then down for second, third and fourth. The brakes aren't great but that's as much a function of a ratty cable as anything. No matter. I got to ride it and that only generated more keen.

Sometime later I fired it up again to take it for a quick spin. I didn't get too far and it died. I did get it started again but soon it died again. This time I couldn't get it to go so I had to suffer the indignity of pushing it home in broad daylight. I took it all as a sign to leave things alone until I started the restoration. Besides, I didn't want to break anything.

During the Summer I decided I would order some new parts rather than rechrome old ones - if anything it was less expensive. So I contacted MZ-B in Germany and ordered new exhaust pipes and mufflers, spokes and rims, fork rubber gators, and a few other bits. With the larger parts being replaced rather than rechromed I decided I would try doing my own rechroming using the Caswell kits.

The tires on the bike are original and looked in decent shape. They are, however, over fifty years old. I was able to get new tires and tubes through a dealer in Vancouver that are a block tread and look reasonably close to the originals.

New parts from MZ-B in Berlin, Germany

It was always my intention to wait until the riding season was over before I actually got started on the restoration. Well, the riding season is over and I am pumped. Bike restoration for me is a three stage process: dismantle, label and see what you really have; do whatever needs to be done with each part individually; and then reassemble. So I hit the dismantling with great anticipation.

Taking the Perak apart was neither complicated nor time consuming. It's the time when you get to see if the harsh reality of what you thought was a great idea actually turns out to be all that nifty. I thoroughly enjoyed the process, I learned lots, and I remain quite pleased with it all. It will, indeed, be a fun project.

Surprising to me was that everything came apart the way it was supposed to. Nothing broke or needed to be ground off not too shabby for a bike over 50 years old. Anticipating potential problems, I did put penetrating oil on the head nuts and the nut on the top of the steering column. The head nuts came off fine and the steering column nut required some patience but ultimately came off okay. Literally nothing else presented any difficulties.

Coming apart easilly

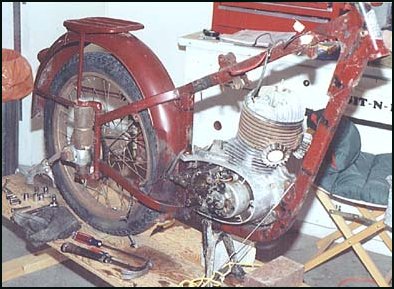
Taking the gas tank off was interesting because it meant first taking the ignition switch box off. Many of the wires to the switch are showing their age with quite brittle insulation. It even had old cloth-type electrician tape (friction tape) on some of the connections - even in the fifties that stuff was fine for hockey sticks but it was never any hell for electrical connections. There was no problem taking the switch box off but I will have to run new wiring to it. With the switch box off I was able to take the gas tank off and get a good look inside it. I was pleasantly surprised by how rust free the inside is. The outside of it will be more labor intensive with removing some dings and rechroming the sides.

Taking the front wheel and forks apart presented some interesting things. The fender brackets are welded to the fender rather than riveted. The fixings bolting the fender to the forks were American Standard. There was a piece of headlight lens glass plus an extra clip inside the headlight nacelle. And, one fork was slightly bent at the top. I also discovered that the frame has been welded just below the steering head braces. All indicators, in my mind, that this little puppy had been in a bit of an accident. I expect it was quite some time ago. The repair on the frame, while not particularly pretty, looks fine and the frame is straight.

Taking the right engine cover off I was pleased to see the generator looked fine and was quite clean. The wires, however, were in the same shape as to the switch box - -toast. The wires from the generator follow a slot in the engine case, behind the drive sprocket. The covering holding all three generator wires was pretty rotten where it still existed. Right behind the sprocket the wire covering was gone and the insulation of one of the wires was worn through exposing the bare wire.

After pulling the head, the engine came out of the frame quite easily - one of the benefits of smaller bikes. Once the engine was on my workbench I pulled the cylinder. Quite interesting. While there was some carbon build-up, it wasn't as much as I had expected given the oils and high oil to gas ratios used in the fifties. The inside of the cylinder is in excellent shape. The piston, however, was different. The top ring was only partially free, the center ring was stuck, and the bottom ring was free. The piston was darkened down the side where the rings were stuck but not scored. My best guess is that with sitting for so long the rings got stuck in old goop. When it ran what little it did before and after I got it, it darkened the piston a bit but didn't do any real damage. Geeze, am I ever glad I backed off running it any more when it died.

Actually, considering the shape of the rings and the shape of the wiring, I'm quite surprised it ran at all. Speaks to what a great little machine it is.

Once I had the wheels off, I took the tires off. The tires are the originals and they might have looked pretty good, but they're clearly old. They didn't have much give in them but I was able to get them off without wrecking anything. Off the rim I could get a better look at them. It's not hard to see they had sat flat for a long time. I will hang on to them because they are quite unique now but there's no way I'd want to ride on them.

Both wheel hubs have to be rechromed and I have new rims and spokes. So, before cutting out the old spokes, I made a jig for each wheel so I have something to start with when I relace them. I also made a chart and list identifying where each spoke goes. Looks fine on paper - sure hope it does as well for real.

So now the Perak is in pieces. Those that aren't obvious are labeled and smaller pieces are in labeled containers. It's a bit of a shock to see how compressed one motorcycle can be. Now I'm ready to start the long process of cleaning, painting and/or rechroming each individual piece. What an enjoyable way to spend one's time!


Click here for part 3 of "Bill's Perak Project"


BACK TO HOME