CZECHPOINT


The Jawa Perak (image from 1952 brochure)  


BILL'S PERAK PROJECT (Part 4)
by Bill English, Kamloops, British Columbia, Canada
Click for Part 1          Click for Part 2        Click for part 3


COMPLETION

After finishing what I could do with chroming, what to do with the gas tank was still unresolved. I had decided the only option was to paint the "chrome" using one of the several chrome-like paints available. Not quite that simple.

I tested five different chrome-like paints. Some looked a little better than others but all of them would rub off on your hand. "No problem," I thought, "I'll just clear-coat them." Well, the clear-coat gave them a nice gloss but drastically changed their color. What I ended up with was a shiny medium gray finish with no metallic look at all. There had to be a better way!

In a moment of inspiration I decided I'd check with the local hobby shop to see what they had for chrome paint. They didn't carry a chrome paint. What they recommended was a chrome foil they had. It's a super thin chrome-like foil called Ultra Bright Chrome available from the Bare-Metal Foil Co (www.bare-metal.com). It's self-sticking, will handle compound curves to some degree, and is relatively easy to use. I bought a sheet (6" X 11.75") and tried some of it on an old fender. It was pretty much as advertised in terms of putting it on. The end result was a metallic finish with about the same luster as aluminum foil from the kitchen. It was not chrome but it was infinitely better than paint. With a clear-coat for protection, it was nice and shiny while still holding the metallic luster.

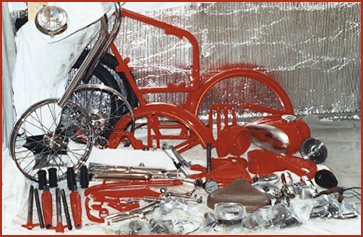
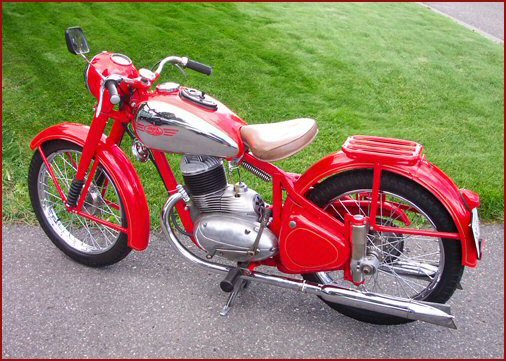
Deciding to go with the foil then meant I had to decide between two choices for painting the emblems on the sides of the tank. Either way I had to paint the tank first before I put the foil on. Then I could paint on the emblems over the foil or I could remove the foil from inside the emblems leaving the paint visible. I decided trying to paint emblems over the foil was more risky than trimming foil out of them.

So that launched me into prepping everything that was going to be painted. Lots of cleaning and sanding. What little filling I needed to do was only a bit on the tank and on both fork tubes. I sanded every piece, by hand, with 80 grit paper, then 120, and finally 300.

bpp10.jpg (25873 bytes)

To do the Perak, I bought a good quality touch-up spray gun figuring I would generate less over-spray. Great theory but I'm not so sure how much difference it really made. The first use was with the primer which gave me some experience with how the gun actually sprayed. It was great fun and I actually ended up with decent smooth coverage.

Every piece was primed, sanded with 400 grit paper, primed again, and sanded again with the 400 grit paper. The primer sets up quite quickly so the whole process only took a few days. Then I let everything sit for a few days while I got set up for the top coat.

Deciding on color wasn't difficult. Interestingly enough, pretty well most of the old literature I saw showed the Perak as a definite red rather than the typical Jawa maroon. That suited me just fine because I prefer a real definite red. I ultimately chose "Viper Red."

bpp11.jpg (31118 bytes)

The top coat painting was pretty exciting. I really enjoyed watching all the pieces become the shiny red finished product. Each piece was painted twice and a few pieces were given another touch up. In the process of doing the second coat, however, my respirator died and before I realized it I had gotten a pretty good snout full of paint fumes. That paint is great on the Perak but it's not too nifty to inhale. I felt pretty rotten for a few days and was probably 3 to 4 weeks before I fully recovered from it. But, the painting was done and I was pleased with it.

While the paint was curing, I went at the engine. The cylinder and head got painted, the engine case got cleaned and buffed with steel wool, and the side covers were buffed on a buffing wheel. Looked pretty spiffy. I reassembled it with a new piston, rings and gaskets.

Then it was time to get back to the gas tank which by now had been totally painted. With ¼ inch pinstriping tape I outlined the area to be chromed. I laid the foil on in 3 pieces per side and smoothed it out which a small firm paint roller. Then, with an Exacto knife, I cut the foil along the inside edge of the pinstriping. The pinstriping was then removed and new pinstriping was laid on to cover the edge of the foil. That part was relatively easy. I still had to tackle the emblem which meant cutting the foil out so the red would be visible. It was a slow and finicky process but I still think doing it that way was better and easier than trying to paint the emblem over the foil.

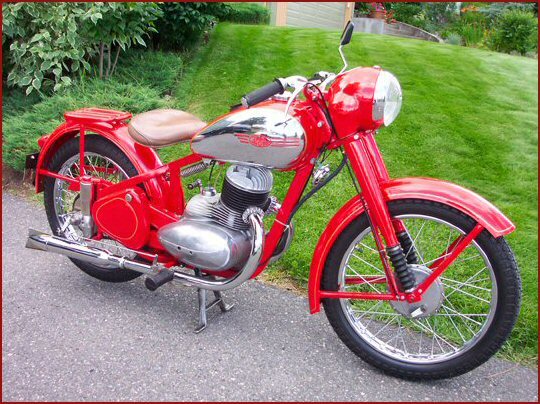
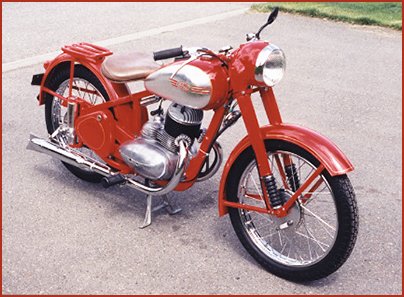
The tank was the only place I used the ¼ inch pinstriping tape. On the rest of the bike it's 1/8th inch.

So there it was - all ready to start putting it back together. I had to replace the wiring so I threaded the various wires through the frame. Getting the forks and headlight nacelle together was a bit of a challenge because of the close tolerances but, with perseverance, it did all go together. The rest of the reassembly went quite smoothly and quickly. All of a sudden, it seemed, there it was in all its glory. "My God," I thought, "what a neat little bike." I spent quite a bit of time just looking at it sitting there in the sunshine.

bpp12.jpg (35540 bytes)

However, I was dying to fire it up and go for a ride. It took a few kicks but it finally caught. It was running but it wasn't running right - wouldn't come close to idling and was backfiring through the carb. Didn't seem to matter how I fiddled with it I couldn't seem to get it to do any better. Eventually the backfiring quit and I was able to go for a short ride but it clearly wasn't right.

bpp13.jpg (40453 bytes)

With the assistance of folks by email we tried to track down the problem. I have no idea how many times I set or checked the timing, or how many times I pulled the carb apart. At one point I thought I found the problem - a leaking crankshaft seal. So I replaced it but doing so made no appreciable difference. The best I could do was to get it running acceptably above idle but it still seemed to be pulling in air somehow between the carb and the cylinder. I did go for the odd ride on it but I didn't want to break anything. Meanwhile, the riding season was slipping past. I was getting pretty frustrated. I had other commitments and so for a couple of months the Perak only got admired and periodically dusted.

Also during the Summer, MZ-B located some refurbished tanks for Peraks. They were rechromed and painted the Jawa maroon. I couldn't pass that up, so I now have a tank with decent chroming on it. All I have to do is paint it to match the rest of my Perak.

The Summer ultimately passed into Fall so any thoughts I had of doing much riding on the Perak were pretty well toast. Before I put it away for the Winter, I had to have one more go at trying to get it running right. I took the carb (which I knew worked) from my 350cc Jawa Model 634 parts bike and fit it onto the Perak. With that arrangement the Perak fired up on the first kick - the best it's ever done. It even idled! Up to about half throttle it ran great. After that the 350cc carb was just too rich for it. I was ecstatic. So I've missed a season of riding the Perak but at least I now know I need to get another carb for it. Geeze, what a relief!

I started this project about a year ago and, until I get it running the way it should, it's not quite finished. While there have been periodic frustrations, I have had no end of enjoyment restoring my Perak. I was quite smitten by this bike when I first saw it - I'm even more so now. I'm as keen on it now as I ever was. Wait till next season!

7/20/2004 Hold the phone! Here is an update from Bill

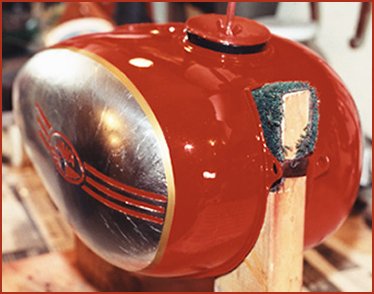
I finally finished the new tank for the Perak. I had played around off and on with various paint thinners, etc., to get the maroon paint out of the insignias on the sides. There is paint remover available but it's pretty strong stuff and quite likely would stain the chrome. Finally, a few weeks ago I went at it with the finest steel wool I have (000).

With light pressure it would remove the paint without marking the chrome but it was a fairly long process - like about 6 hours. After that it was just regular fare of light sanding, masking off the chrome, prime, sand, and spray on the top coat.

The insignias were partially chromed in so were not going to be easily painted. I went to a local sign maker who made up the insignias and the strips with a good quality vinyl sticker. It went on pretty easily and definitely looks better than anything I could paint on freehand.

bpp14.jpg (122582 bytes)

Mechanically, the Perak has been an absolute joy since I put the new carb on. I've put on a little over 1200 miles just booting around town with it. It's worked out to be quite dependable, always easy to start, and no end of fun to ride.

bpp15.jpg (146048 bytes)
Bills "Really Finished" Perak

Special thanks to Reese Dengler for doing this website and to Hans van Leeuwen, Don Kueny, and Mike Thomason for all their help and support. Also thank you to Edgar Uher (MZ-B) for great parts and service!


The End


BACK TO HOME